TestArchitect Corner: Codeless API Testing

API testing has long been misunderstood as well-confined in the territory of developers. It’s natural to think that we must write code to test our code. However, it doesn’t have to be that way anymore. Business testers who have deep domain knowledge are now able to take on the challenges of API testing without coding. That approach is called “Codeless API Testing”. In this article, we’ll examine how business testers perform codeless API testing using TestArchitect.
What is web service testing?
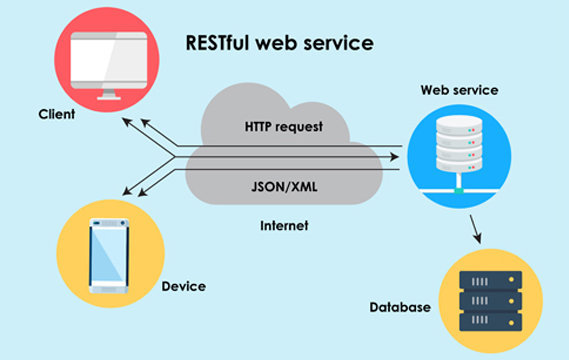
As we all know, web services are applications that can be published and called over the Internet by client applications. Think of a web service as the communication medium, through which two applications exchange data regardless of their underline architecture and technology.
Most of today’s client applications crucially depend on complex web services. Thus, ensuring the robustness of those web services from both functional and non-functional aspects is almost always obligatory, much like a social contract.
It is unarguably vital to execute functional and integration testing on your web service during pre-deployment stage to identify and resolve defects as early as possible, and performance/stress testing during post-deployment stage to assure service responsiveness and availability.
Planning a web service functional test
Before creating any test procedure, plan your web service testing as follows:
- Define which service functionality should be tested.
- Determine which APIs of the service with specific versions are to be verified. It’s preferable to take advantage of machine-readable service description languages such as WADL and WSDL.
- Specify which APIs to be called, the call order and how you verify the returned HTTP results (usually either in JSON or XML format).
After planning your test, we can now start creating our test suite.
A basic web service test
Almost all of web services these days fall under either SOAP or REST. Anyhow, a web service test typically consists of the following steps:
- Authenticate.
- Construct the http request.
- Send the http request & get the response.
- Parse & check the http response.
Below is an example test scenario written in Action-Based Testing Language (ABTL). Note that our web service under test is JIRA’s REST API. In this test scenario, we’ll create a bug on JIRA and check whether it is created successfully and its ID follows the correct format.
As you might notice, the above test scenario consists of several actions instructing how TestArchitect interacts with the web service.
The first step is authentication. TestArchitect supports two main methods:
- Basic HTTP authentication
- OAuth 2.0
In this example, we use Basic mode by encoding username:password in Base64 format.
An online Base64 encoding tool for your convenience is here. For more information about specifying credentials, check out this article. JIRA’s Basic authentication mode is described here.
Next, we prepare the data for the JIRA issue to be created. It’ll be a bug belonging to a fictional project.

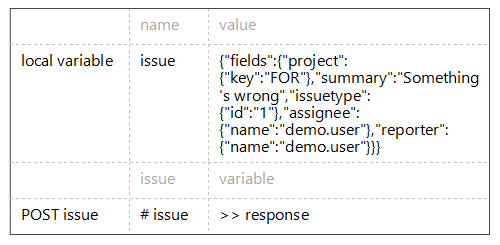
“POST issue” is a high-level action which, creatively enough, sends an http POST request to the respective API. The detailed content of “POST issue” action is below.The above JSON string describes the specifics of the bug we’re posting. This bug belongs to the project whose keyword is “FOR”. Its summary says “Something’s wrong”. IssueType with ID=1 is a bug. The rest of the string specifies the Assignee and Reporter fields respectively.
This “POST issue” action takes in “issue” argument and returns the http response as “variable” argument.
create http request instantiates a new http request object which the ensuing test lines define. add http header states that the request’s content type is JSON. Note: if you’re sending a GET HTTP request, you can add parameters using add http parameter.
add http body encloses the issue’s information we prepared above. Finally, TestArchitect sends the pre-defined http request to the corresponding URL as a POST message. It expects the return status to be 201 (success) and the rest of the response will be stored in “variable”.
Let’s get back to the test module. After posting the issue, we need to parse http response and store the body in the “json” variable. The last step is to verify the key of the newly created issue follows the correct format (“FOR-XXX”) using a regular expression (.*). When the test passes, you’ll observe a similar result as below.Any JSON strings can be parsed using get json query result in TestArchitect. Note that you have to provide a JsonPath (see the bubble on the next page) to tell TestArchitect what piece of data to retrieve. In this specific example, we want the “key” field stored in the “key” variable.

What is JsonPath? Much similar to the use of XPath in XML documents, JsonPath is the querying language that helps you retrieve certain chunks of a JSON tree structure without parsing the string on your own. The dollar sign ($) represents the root node in the JSON tree structure. With TestArchitect, you can simply omit that dollar sign for better readability. Use dots (“.”) to denote parent-child relationship among node names. For instance, this path $.phoneNumbers[2].number gives you the 3rd phone number (indexes start at 0) in the list named “phoneNumbers”.The bracket-notation is not supported. For more information, refer to this article.
More comprehensive test scenarios
TestArchitect empowers you to do much more than the above basic test scenario:
- Your test scenarios don’t have to stop at testing only one API. With the above package of built-in actions, you can create service integration tests jumping from one API to the next.
- Better yet, you can create end-to-end service tests by reusing user-defined actions, such as insert product or delete product. Doing this will elevate the abstraction of your tests from low-level HTTP interactions to high-level business logic actions, which are obviously much more meaningful to Business Testers.
- Check points aren’t only confined to JSON but also XML and database actions such as check xml query result or execute sql. For instance, you can compare the HTTP response in JSON format from a web service to a data record retrieved from a database.
- You can create one set of tests that can be executed at UI-level and service-level using TestArchitect’s Multivariate feature.
- You can mix UI and service operations in user-defined actions when necessary.
- You can manage your test data within TestArchitect.
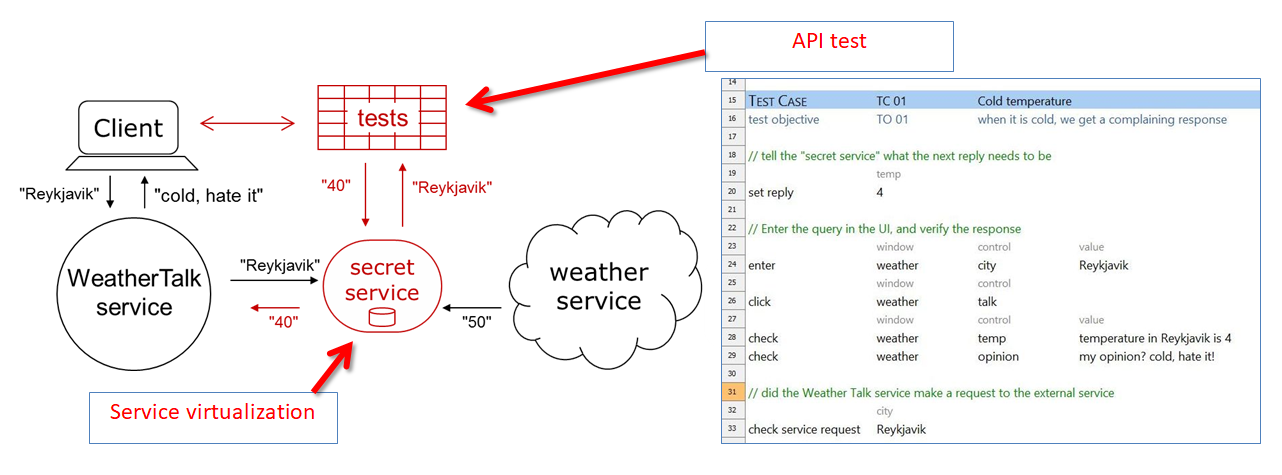
- You can perform Service Virtualization with TestArchitect as shown below.

Auto-generating Codeless Tests for API
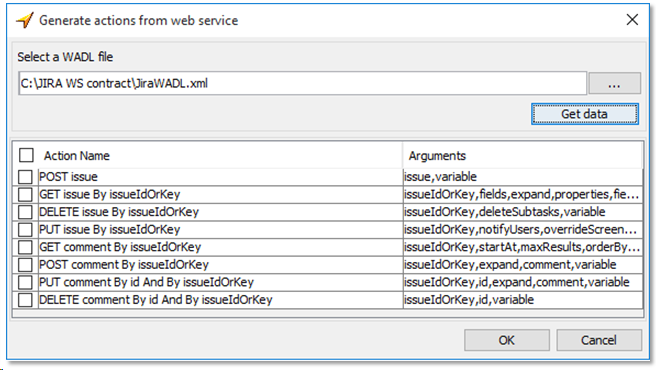
TestArchitect also supports you to auto-generate codeless tests for API using webservice description files, e.g. WSDL files and WADL files. You can simply specify the WSDL or WADL file and TestArchitect will automatically detect the possible codeless actions that you can generate. See the picture below.

To obtain this version of TestArchitect, please contact our team at sales@logigear.com.
Important Note Codeless-ness is by no means a golden handcuff. If you prefer coding, you can still create user-scripted actions in the TestArchitect harness (available in C#, Java and Python) to programmatically perform any tasks such as retrieving test data from another web service or database. Harnesses allow developers and QA to work hand in hand to foster “Integrated Integration Testing”. Exclusive: In this article, Jake Wallingford tells the story of how his team facilitated tight collaboration between developers and QA to create better integration tests by utilizing TestArchitect.
Conclusion
With all these capabilities at your fingertips, you and the rest of the Business Testers can now start being productive right away with minimal coding needed.
Stay tuned for the upcoming article discussing how you can Dockerize TestArchitect components to test your web service hosted in a Docker container as easily as flipping a switch.
To learn more about TestArchitect features and supported platforms, read on here.
Happy testing!


.svg)

