

Dockerize your TestArchitect tests
Docker is a virtualization platform enabling you to create containers – mini virtual machines— which have their own predefined environment, including file system, libraries and settings. Best of all, these light-weight images eat up only a few megabytes of your storage, instead of several gigabytes like a full-blown virtual machine.
Since we package not only the app but also its running ecosystem, the greatest benefit of dockerizing your app (usually SOA microservices) is zero-dependency deployment from development to testing to production environment. However, during the test phase, somehow you still need to install and configure your automation tool of choice to run natively in the Docker environment. Such process could potentially be cumbersome.
With TestArchitect, you can spring up the “testing stuff” to test your API or web apps within a Docker container as easily as flipping a switch.
How it works
For your convenience, the TestArchitect team has published an official Docker image here. This image contains all TestArchitect components necessary to run the following types of tests:
- API testing
- Headless Chrome testing
Headless Chrome is a web browser without graphical user interface. It’s typically faster than the real Chrome thanks to not starting up the browser GUI and bypassing all the time a real browser takes to load CSS, Javascript and render HTML. Note that this image is based on Ubuntu 16.04.
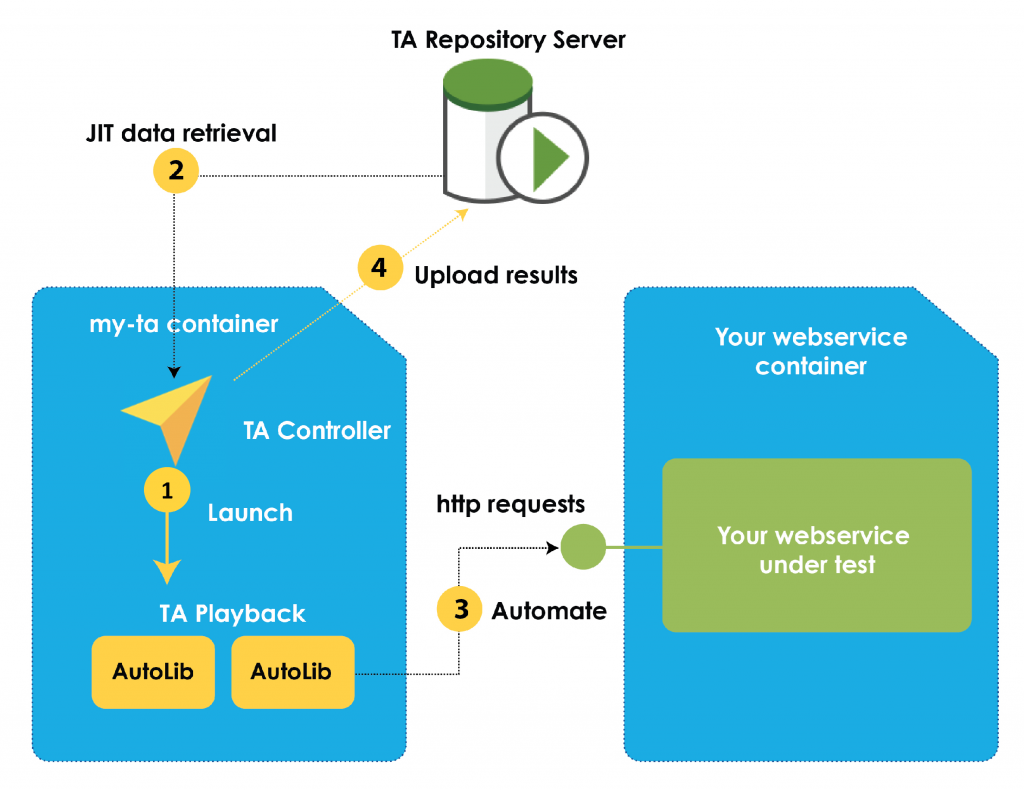
Every time you spin up this TestArchitect image (more instructions on how to spin it up in the following sections), TA Controller is started. Once Docker executes the test triggering command, TA Controller automatically launches TA Playback along with related Automation libraries, and connects to the corresponding TA Repository Server to get the relevant test artifacts.
The download process is just-in-time, which means TA Controller “talks” to TA Repository Server right at the moment it needs a certain file.
Each interaction between TA and your API or web app is silently performed inside the containers so you won’t notice anything besides the run status that TA Command Line prints out on your console.
Since we already specified that the run results will be uploaded to TA Repository Server, you’ll need to open TestArchitect Client connected to the corresponding repository to view the results on any machine.
Get the TestArchitect image
Assuming that you already got Docker CE for Ubuntu, you can execute the below commands (with root privilege) to pull the official TestArchitect image to your local box:
$ docker pull logigear/testarchitect:8.3.4.5070
To spin up (run) the image you’ve just pulled, use this command:
$ docker run -it –rm -p 53600:53600 –name TAInstance1 logigear/testarchitect:8.3.4.5070
Voila! Now you got a TestArchitect container up and run.
Generate TestArchitect batch files (*.sh)
Assuming that you already have a full API or headless Chrome test suite, you now need to select those test modules and generate a TA batch file (*.sh) from any TestArchitect Client connected to the desired repository. Let’s name the file as mySmokeTest.sh.
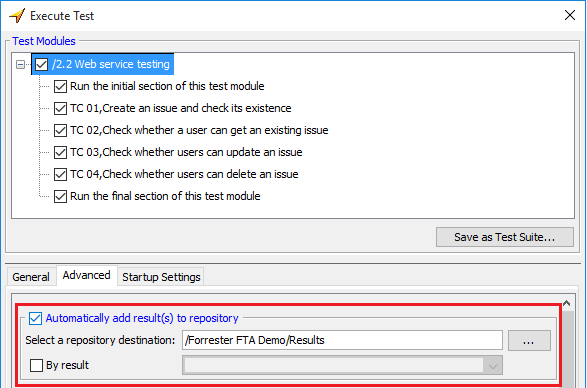
To make sure the results are stored on your repository, you’ll need to turn on the “Automatically add results to repository” option when generating your batch file.
One last step to make the .sh batch usable is to edit it a little bit:
- Insert #!/bin/bashas the first line of the file
- Change the localhost argument to <ContainerName>, e.g. TAInstance1
- Copy the *.sh file (sh) to any folder on your local drive (host machine). In this example, I’ll copy it to: /usr/local/local_test_data/Full_permission/Batch/
Run the automated tests
Now you’ve pulled the TestArchitect image in your local Docker repository, spin it up and generated the batch file containing the necessary automated tests (API or headless Chrome) to run at the right location. It’s time to actually trigger the automated tests using the following command:
$ docker run -it –rm -p 53600:53600 –name -v /usr/local/local_test_data/Full_permission/Batch/:/Batch/ logigear/testarchitect:8.3.4.5070 “/Batch/mySmokeTest.sh”
Your automated tests should be running at this moment. Running status will be displayed on the console.
After a few minutes (usually faster than a normal test execution on a physical machine), your test results will be available in the Repository Server. You can use any TestArchitect Client to connect to that repository and view the returned results.
Some notes:
- Make sure the API under test or the web app under test is running beforehand.
- Remember to generate new batch files (*.sh) and copy them to /usr/local/local_test_data/Full_permission/Batch/ before running if you want to change the automated tests to run.
Conclusion
Docker is much easier to control than the heavy-and-mighty virtual machines. For instance, you can spin up a container in a snap by just running a prebuilt lightweight image. This is extremely beneficial during the test development phase because it gives you the necessary convenience: run tests with different configurations while being able to develop more tests in one local box. Besides, Docker also enables scalability in your test execution. Spinning up hundreds of Docker containers to run TestArchitect tests is certainly way cheaper than hundreds of VMs.
Happy testing!

.svg)

