5 Tips for Getting Software Testing Done in the Scrum Sprint

A clear practice with the support of tools will help teams be more successful in delivering done products.
It is always challenging to create a piece of a software system that fulfills a customer need, ready for use. Especially when it should be realized in an iteration of just three weeks, from an idea to a fully functional and tested piece of the application. Achieving the ‘Definition of Done’ as it is called in the Scrum approach.
Agile approaches embrace short iteration cycles where releasable pieces of the software system are created. Releasable means also tested. Unit tested, system tested, functional tested, acceptance tested and often also performance and load tested. Making the item ready for use should allow providing feedback for the development team. Feedback how they are doing and if it is what the customer really needed.
Many teams find this a troublesome challenge and aren’t successful in it. They deliver half-done products or a make workaround for the agile approach (in Scrum often called ‘Scrum but’). Many agile workarounds contradict the goal why a team adopted an agile approach. For example a standalone test team or a separate test iteration to get the testing done will result in less agility and less feedback loops.
This article will give you five tips how a clear practice with the support of tools will help teams be more successful in delivering done products when using an agile approach. Actually many tips will also be helpful for other methodologies and project approaches. This article uses Microsoft Application Lifecycle Management tools as an example, but the tips are valid for any other ALM tool suite.
Many readers will possibly think “tools, wasn’t that evil in agile? People, interactions versus tools and processes”. This is half-correct: it isn’t evil and yes interactions are very important and solve miscommunications way better than tools and processes ever can. However, tools can help. Tools and practices can support a way of working. Application Lifecycle Management tools suites, integrated tools with a central repository for all involved roles support collaboration between roles. They support collaboration between artifacts these roles create and teamwork between the work these roles execute. A recent Gartner report says that “Driven by cloud and agile technologies, the ALM market is evolving and expanding.”
Tip 1: Get a team
This is actually not a tip, it is a must. This is a kind of obvious but not common and the hardest thing to accomplish. Get a team, get testing knowledge in your team. When you don’t have it, you will fail. Teams and companies have failed to reach their agile software development goals only because it was impossible to get different disciplines together in a team.
For example, the code implementation is done in an agile way, with Scrum boards and daily standups together with the customer. This is done because the customer wanted to be more flexible in what is needed in the system. However, software testing is done in a separate iteration and cadence because this role is the responsibility of a different department. Bugs are found in functionality realized sprints ago, testers needs more detailed requirements descriptions because they don’t understand the backlog items, pushing the customer in the corner to be more descriptive and fixed till testing was done. The customer loses all the flexibility he needed and gets frustrated.
This is just a simple example how it could go wrong when you don’t have a team. And there are thousands more. It isn’t easy to accomplish a collaborative environment where all roles work seamless together. Testers and developers are different, as a nice quote describes it:
In the D-world, the world of the Developers, we think Generalist Testers are pencil-pushing, nit-picky quality geeks. Mostly they are beside the point and are easily replaced. They seem to like making much noise about little defects, as if we made those errors deliberately….
In the T-world we don’t hate the Developers for their perceptions. We are disappointed about the poor quality of the software. Bad assumptions on the part of Developers are more to blame for the problems than are software weaknesses.
We never (or seldom) get software what will work right the first time. No, in the T-world we think that developers forget for whom they are building software, it looks like they are building for themselves…
If you try to combine these two worlds in one team, you definitely need to come up with a Collaborative Culture
The three most important concerns are:
• Trust.
• A topic closely associated with trust when it refers to people is Identity.
• Collaborative culture.
• A collaborative culture consists of many things, including:
• Collaborative leadership;
• Shared goals;
• Shared model of the truth; and
• Rules or norms.
• Reward.
• A “reward” for successful
collaboration is most often of a non-financial nature.
Show me the value, seems to be the magic word. Test adds knowledge, knowledge during the grooming of the backlog. They help the product owner with defining proper acceptance criteria. Testers can help find improper written backlog items, finding inconsistencies in the flow of a business case for example. A great test activity in the TMap testing approach can help, assessing the test base. TMap is a test management approach which structures the testing effort by providing different phases and tasks, see the TMap.NET web site for more details. Simply explained: tests find bugs in the requirement. In both ways the test role helps the product owner and the team to focus on value.
Tools can help. The Visual Studio 2010 TMap Testing Process template gives test activities a more important place, helping the tester to get on board.
Visual Studio Process Templates are supporting a way of working. They contain several work items types with a flow. For example, a bug work item type can go from the status ‘new’ to ‘assigned’ to ‘resolved’ and ‘verified’. Such a work item can hold a lot of information, supporting the work that needs to be done to bring the work item to the next status. A process template is easy to customize and work item type fields, flow, validation and rights can be edited. Creating a new type is also supported. For example the TMap Testing Process Template has an additional type “Test Base Finding”, helping the management of problems found in the test base (backlog).
The ‘Testing’ Tab with test activities, next to the implementation tab.

Figure 1: Test Activities in Team Foundation Server
Still two different worlds in this way, but it gives a good visual reward of being connected. Many teams probably won’t need an additional visualization of the testing effort and can use the Scrum process template in combination with their testing methodology. This will help them to get started.
The manual test tool ‘Microsoft Test Manager’ (MTM) in Visual Studio is interesting. It helps teams to get more connected as it shows the pain points where the collaboration isn’t seamless. Adopting MTM can thus be a good start for agile teams to get testing aboard, but be aware the interactions are more important as tools. The tools won’t fix bad collaboration, mismatching identities, lack of trust and won’t give any reward.
Tip 2: Write logical acceptance tests
The previous tip “get a team” already explained the benefit of having testing knowledge onboard during the requirements gathering. Two practices are mentioned: assessing the test base and helping with acceptance criteria. This tip is close to the second practice, when the team benefits from being able to capture acceptance criteria in logical test cases.
During the release planning meeting, capture acceptance criteria and immediately add them as logical test cases linked to the product backlog item. This will help the team to understand the item and clarify the discussion. An even more important benefit of this tip is that it helps testers be involved and be important at the early stages of the software cycle.
With product backlog items you could use the following use story style for the description (or title): — As a [role] I want [feature] So that [benefit] —
You can use a similar format for acceptance criteria: — Given [context] And [some more context] When [event] Then [outcome] And [another outcome] —
Acceptance criteria are written like a scenario. SpecFlow (see SpecFlow website) is a Behavior Driven Development tool that also uses this way of describing scenario’s, from where it binds the implementation code to the business specifications.
Tools can help to immediately create and link test cases to a backlog item. Having them present for further clarification and ready to get physical specified with test steps. Visual Studio Process templates support this kind of scenario.
A Product Backlog Item can have the fields ‘description’ and ‘acceptance criteria’ (see image).
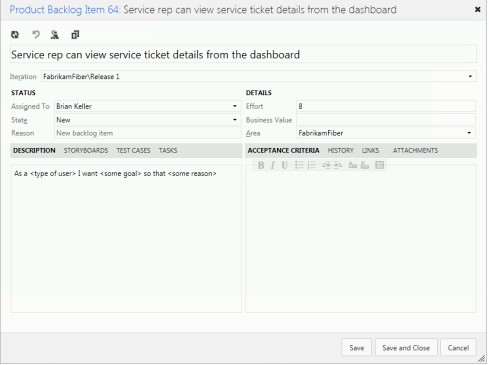
Figure 2: Product backlog item form in TFS
It can also contain a linked test case. Create them from the Tab ‘Test Cases’ and give them a meaningful title.
You can re-use the logical test cases in Microsoft Test Manager by creating a sprint Test plan and add the backlog item to the test plan. The logical test cases will appear in your test plan, ready for further specification.
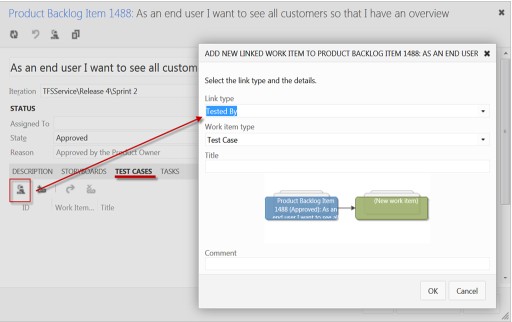
Figure 3: linking logical test cases with product backlog items
Once I tried to implement this practice in a project the testers didn’t agree. They were afraid the developers only would implement the functionality that was written in the logical test cases. For them, knowing on forehand what was going to be tested seemed a bad idea for them. I had to work on Tip 1 first before the team could move forward.
Tip 3: Use a risk and business driven test approach
When there is no risk, there is no reason to test. So, when there isn’t any business risk, there aren’t any tests and is it easy to fit testing in a sprint. More realistically, a good risk analysis on your product backlog items before starting to write thousands of test cases is a healthy practice.
Risk is also an important attribute in Scrum. The release plan establishes the goal of the release, the highest priority Product Backlog, the major risks, and the overall features and functionality that the release will contain.
Products are built iteratively using Scrum, wherein each Sprint creates an increment of the product, starting with the most valuable and riskiest.
Product Backlog items have the attributes of a description, priority, and estimate. Risk, value, and necessity drive priority. There are many techniques for assessing these attributes.
Product risk analysis is an important technique within the TMap test approach. Risk analysis is part of the proposed activities in the Master Test Plan of TMap: ‘Analyzing the product risks’. It not only helps the Product Owner to make the right decisions, but it also gives the team advantage in a later stage. Risk classification is invaluable while defining the right test case design techniques for the Product Backlog Item.
“The focus in product risk analysis is on the product risks, i.e. what is the risk to the organization if the product does not have the expected quality?
Having a full product risk analysis for every Product Backlog Item during the Release Planning meeting is slightly overdone, but the major risks should be found. Determining the product risks at this stage will also provide input for the Definition of Done list.
Within the Visual Studio Scrum 1.0 Process Template Product Backlog Items are written down in the Work Item Type ‘Product Backlog Item’. This Work Item Type hasn’t got a specific field for risk classifications. Adding a risk field is done easily. To integrate testing in a sprint, you should know the risks and use test design techniques that cover those risks, writing only useful test cases.
Tip 4: Regression Test Sets
In the same context as tip 3 you can think of regression tests sets. Some teams rerun every test every sprint, this is time consuming and isn’t worth the effort. Having a clear understanding of what tests to execute during regression testing raises the return of investment of the testing effort and gives more time to specify and execute test cases for the functionalities implemented during the current sprint.
Collecting a good regression set is important. There are a lot of approaches how to get this regressions set, most of them are based on risk classifications and business value (see the previous tip).
The principle is that from each test case a collection of additional data is determined into the test cases for the regression test are ‘classified’. Using these classifications all cross-sections along the subsets of test cases can form the total tests that are selected.
Automation of this regression set is almost a must (see next tip: test automation). Making a good selection which test cases to select is a trivial task. With excel you can do some querying for proper test cases but this gets harder when they are in different documents. Testing is more efficient if you have good query tools so you can easily make a selection (and change this selection) of the test cases are part of the regression run.
A team I supported had more than 15.000 test cases distributed over about 25 feature test plans and 10 Scrum teams. For the execution of a the regression set, a query needed to be run over all test cases to create a meaningful selection for the regression set.
Test cases in Team Foundation Server are stored as work Item Types in the central database brings, which has powerful query capabilities. You can write any query you want, save it and use it for your regression test selection. The team I supported used query based test suites to save the selections.
Microsoft Test Manager has an interesting capability to control the amount of regression testing that need to be done during the sprint. A feature called “Test Impact”, gives information about test cases which are impacted by code changes.
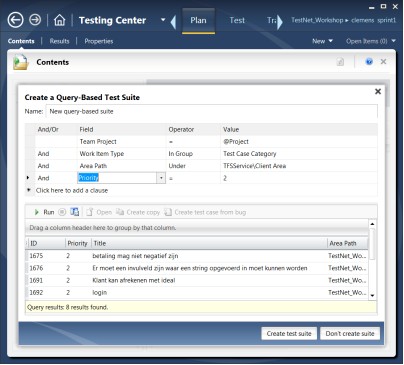
Figure 4: Microsoft Test Manager Query based test suite on priority
Tip 5: Test Automation
All validation activities (test) cost time and money. So, every activity to test a system should be executed as efficiently as possible (see previous tips). Adding automation to the execution of these validations saves execution time, which saves money. But the creation and especially the maintenance of test automation cost time and money. So, the hard question is “what and how should we automate for our system validations”, where is the breakeven point of test automation in the project.
The ROI of test automation is a challenge. We have to think of how long is the test automation relevant in our project (for example not all functional tests aren’t executed every sprint, only a sub set, only the most important, see this post ‘only meaningful tests’) and how many times is the validation executed (how many times over time and also on different environments). This gives us indications on how much effort we must put in our test automation.
There are three basic test automation levels:
- No Automation
- Test Case Record and Playback
- Test Scripts
Visual Studio adds two other levels.
- No Automation
- Shared steps with Record and Playback (action recording)
- Test Case Record and Playback (action recording)
- Test Scripts (Generated Coded UI)
- Test Scripts (Manual created Coded UI)
Any other test automation tool will probably add his own value, but let’s focus on Visual Studio levels.
All these automation levels have an investment, and a maintainability level. The better you can maintain a test case, the longer you can use it for your ever evolving software system. That is the connection between ‘how long’ and ‘how well maintainable’. Another connection is the effort it takes to create the automation. The resulting benefit is that you can execute your script over and over again .
The ideal situation: a test script with very small investment to create, used for a test that needs to be executed the whole life of the application and that doesn’t change overtime. No investment, no maintainability issues, maximum amount of executions. Result: maximum ROI.
Too bad, we’re not living in the ideal world. So we need to make some tradeoffs.
1. No automation.
No need for maintainable test scripts, no automation investment. I have customers who use Microsoft Test Manager for test case management only, and they are happy with it. They maintain thousands of test cases and their execution, gathering information about the test coverage of the implemented functionality.
In most situations, this is an ideal starting point for adopting Microsoft Test Manager and starting to look at test case automation. As a test organization, you will get used to the benefit of integrated ALM tools that support all kind of ALM scenarios.
2. Shared Steps with Action Recording | Record Playback parts.
Collecting an action recording takes some effort. You have to think upfront what you want to do, and often you have to execute the test case several times to get a nice and clean action recording. So there is some investment to create an action recording that you can reuse over and over again. In Microsoft Test Manager you can’t maintain an action recording. When an application under test changes, or when the test cases change, you have to record every step again. A fragile solution for automation.
Using Shared Steps (reusable test steps) with their own action recording solves this a bit.
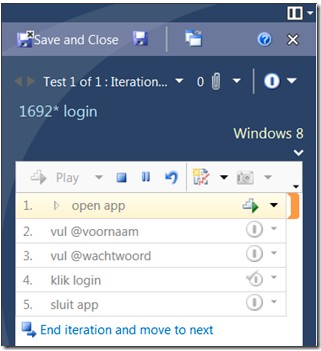
Figure 5: Playback share steps in Microsoft Test Runner
Find the test steps that appear in every test case, make a shared step of these steps and add an action recording to it. Opimize this action recording and reuse the shared step in every test case. This definitely improves the ROI. Now you can fast-forward all the boring steps and focus on the real test.
The good thing is that when a shared steps changes, you only have to record that one again. Creating multiple shared steps with action recording and compose a test case is also a good scenario. After the zero investment, this is a good next step. You get used to the behavior of action recordings and have the benefit of reusing them throughout the project.
Action recordings of shared steps keep their value the whole project, there is some effort to create and maintain them but you will execute them for every test case, a good ROI.
3. Test Cases with Action Recordings | Full Test Case Record Playback.
The same activity as for the Shared Steps action recordings. But, you will use the action recording less and it is harder to maintain (more test steps). The ROI is thus much lower than in the Shared Steps situation.
The scenario where you create the action recording and execute often, for example on many different environments, will provide benefits. Microsoft Test Manager action recordings can be recorded on one environment and playback on another environments.
Another reason you might want to go with this scenario, is that you want to reuse the action recording for test script generation. See next step.
4. Generate test script from action recording.
This is a really nice scenario for quickly creating test automation scripts. See this How To video [6]. The maintainability of the generated code is hard. There are some tools in place to react on UI changes, which make it easier. With Visual Studio 2012 default the Code UI Map Test Editor is available to edit search criteria, rename controls and create methods.
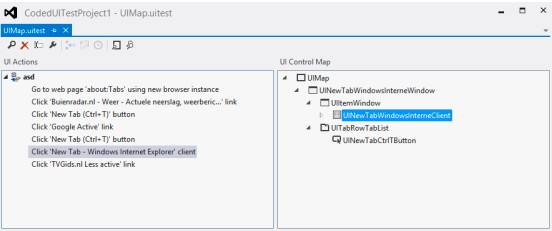
Figure 6: Visual Studio UIMap editor
Due to the UI Map XML, some common development practices like branching, merging and versioning of the test script are a challenging task.
In conclusion, the creation of test scripts generated from action recordings is really fast but hard to maintain. Together with the recording of the action recording (number 2), this influences the return on investment.
5. Write your own Test Script (by using the Coded UI Framework).
Write the test automation script yourself, following all the good coding principles of maintainability and reusability like separation of concerns, KISS principle, Don’t Repeat Yourself, etc. The Codeplex project Code First API Library is a nice starting point.
This automation scenario is the complete opposite of the generated test script (3). This one is hard to create, it will take some effort, but is (if implemented well) very maintainable, and you can follow all the coding practices and versioning strategies.
So, Microsoft Test Manager with Coded UI supports different test automation scenarios. From a fast creation with some maintainability (2 and 3) pay off, to harder creation with better maintainability (4). It is a good to think up front about test automation before starting to use the tools randomly.
My rules of thumb are:
- Use levels 3 and 4 in a sprint and maybe in a release timeframe, but not longer. Maintainability will ruin the investment.
- Use level 5 for system lifetime tests. They run as long as the system code runs and should be treated and have the same quality as that code. Don’t use it for tests you only run in a sprint, the effort will be too big.
- Use levels 1 and 2 always whenever you can. It supports several ALM scenarios and the shared steps action recording really is a good test record-playback support with some good ROI.
Conclusion
These five tips should make your testing effort more efficient. And they will not only work in agile projects, but they will work in all types of project. Only in agile projects you will feel the pain earlier when things go less efficient as planned. Not only these tips will bring benefits to your project, but I encourage you to create and try your own tips and improve them for every sprint.
(This article was originally published on https://www.methodsandtools.com/archive/testingscrum.php)


.svg)

