Trying to understand why fails, errors, or warnings occur in your automated tests can be quite frustrating. TestArchitect relieves this pain.

Debugging blindly can be tedious work—especially when your test tool does most of its work through the user interface (UI). Moreover, bugs can sometimes be hard to replicate when single-stepping through a test procedure.
Suppose you executed a long, automated test that contains a good deal of interaction with the interface of the Application Under Test (AUT), such as mouse clicks, keyboard input, menu item selection, etc. When viewing the generated test results, it may be difficult to understand why some fails, errors, or warnings have occurred. It would be easier to identify any issues if the test results were accompanied by snapshots of the screen’s display just before, during, and after any interactivity between the test and the AUT’s UI.
To address this problem, TestArchitect allows snapshots to be automatically taken of the AUT’s display at various critical points during test execution. By letting you observe the display state of the AUT at each stage of the test, you can have a better grasp of where and how a test or application is going wrong. Users can tell TestArchitect to capture screenshots during Test Automation with each UI interactive action. These screenshots help you to better visualize what took place in order to more easily debug any problems that have occurred.
The number of screenshots retained by TestArchitect is determined by user settings in the Screenshot recording panel of the Execute Test dialog box just prior to the test run.
Users can specify the events (Passed, Failed, or Warning/Error) for which associated screenshots are to be retained. They can also specify the number of preceding screenshot sets that are to be retained for each
qualified event. A single screenshot set consists of all the screenshots captured during a single UI-interactive action. The below image indicates that three screenshot sets are to be retained and logged for each Failed and Warning/Error event of the test: the screenshot set of the associated Failed/Warning/Error action and the screenshot sets of the two UI-interactive actions preceding it. Note that if the Keep field is left blank, screenshot sets for all preceding UI-interactive actions are retained.

Screenshots captured during testing are displayed in the Result Details and Failure/Error Summary tabs of local test results.

Once users click on a captured screenshot thumbnail in the Result Details tab, the screenshot viewer appears.
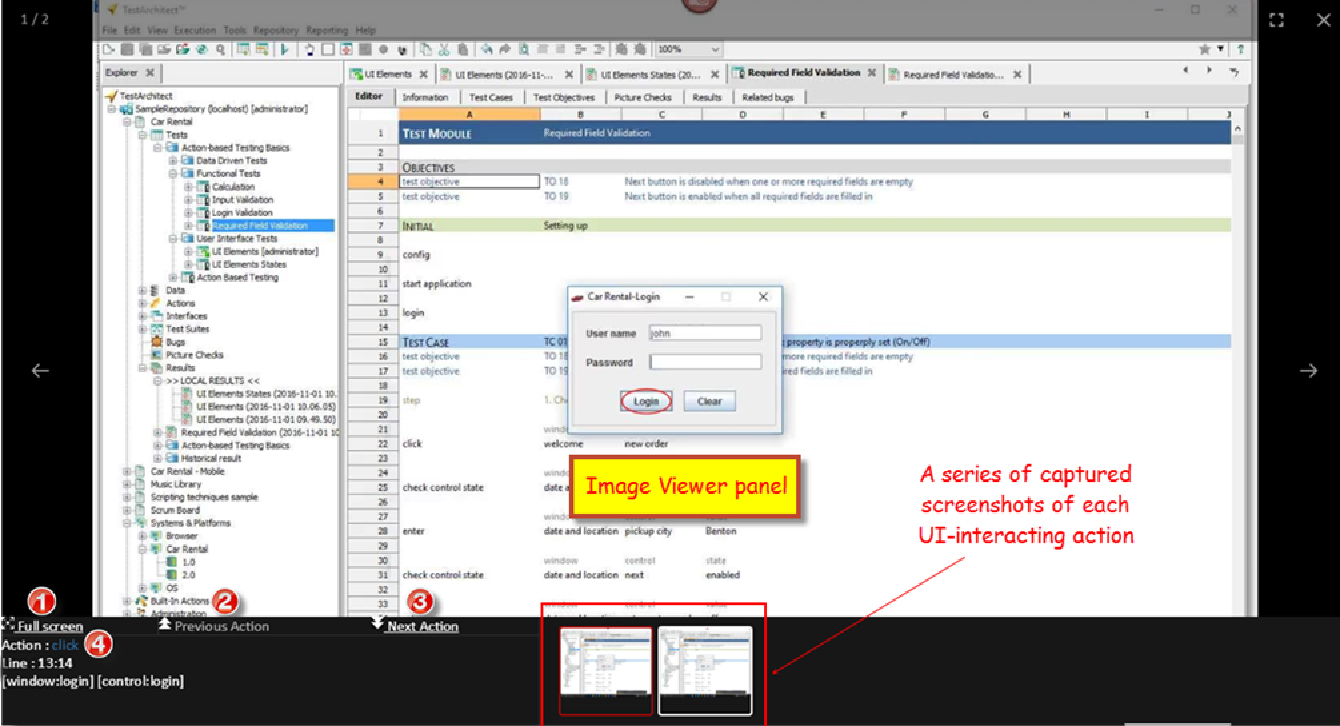
The screenshot viewer incorporates a number of functions (below).
- Fit screenshot to the Image Viewer panel (full screen)
- Go to the previous recorded UI-interacting action
- Go to the next recorded UI-interacting action
- Click on the action name to launch TestArchitect
- Client, displaying detailed description of the UI-interacting built-in action
Click on the action line number text to launch TestArchitect Client, which displays the corresponding line in its execution context.
TestArchitect doesn’t only snap pictures. When you have screenshot recording enabled, it can also record video of the entire automation process, storing it at the end of the test run as a video (.mp4) file on users’ machines.
Not only is this screenshot recording feature supported for executing tests on computers, it’s also supported on Android and iOS mobile devices. To learn more about this feature, visit testarchitect.com and download TestArchitect for free here. See how beneficial this time-saving feature can be when you’re testing.